Thursday, September 7, 2017

Changes All Around...A New Crafty Journey

WARNING....this is a long post...lol

Hi everyone...I know it's been quite a while since I've posted anything but I've been undergoing several changes and challenges. First off...hubby decided to retire and sell his business to our son. Which led to us quickly realizing that we could not afford to stay in Southern California. So after much searching, we decided to purchase a home in Bullhead City, Arizona. Now I know you're thinking but it's hotter than heck there, but I'm learning to survive and the winters are absolutely gorgeous. Anyway, we love it here...it's so peaceful & beautiful here in the desert with no traffic except maybe on holidays when the river crowd are here.

So of course, I have a new craft room which I love even more than my old one if that's possible. It's nice cause it's the formal dining room (which we didn't really need) so I'm connected to the living room. But I didn't think purple walls would "go" with the living room so we did beige walls but I still have my purple accents...here's a couple of pics...


Drawback is there is no scrapbook store around here *gasp* I know. If you have followed me in the past, you know I used to teach and design for my local scrapbook store and then I did workshops in my home with a another company. So all we have here is a JoAnn's and a Quilt Store (which is another story for another day...lol). To make matters worse, I only know one or two people who live here and they are only part-timers. I miss my So Cal Crafty Friends so much!!! So I am on a mission to find new crafty friends. So I decided to join up with Fun Stampers Journey as one of their journey coaches cause I absolutely love their products. And the more I learn...the more I love it. Stay tuned for lots of cute projects and info coming on their huge variety of products.


Here is a card that I designed for you all...


I used the Autumn Days Stamp Set (SS-0006) which is really nice set that has a coordinating die set (DI-0118) so you don't have to fussy cut it...yay!!! I did a fantastic marbling technique with our Silks and Water which is very easy to do. You put water in a shallow tray or pan, then splatter little drops of silk on top of the water, swirl lightly with a stick or pencil to create the swirls then drop your paper on top of the water and then pick it up...so cool....so 60's....lol. I used Cranberry Bliss, Citrus Cooler, and Dark Roast Silks on mine. Be careful of the dark colors though as they can really dominate the design. Play with it and have fun!!!  My leaves were stamped on Hazelnut, Banana Cream, Pumpkin Bread, Lemongrass, and Whip Cream Cardstocks. I colored the Whip Cream Leaf with some Pan Pastels and popped it up on top of the others. Then I stamped the sentiment in Hazelnut Blend and mounted it all on a Hazelnut Card Base. I also used some Natural Journey Twine and some  Fashion Silver Accents for some pizazz. And of course I splattered a few drops of the silks on there...including the Sparkle Silk (my favorite). I may try my hand at a video...I don't know...that's a big scary step there...we"ll see...lol

Well, that's it for today...sorry it was so long! Hope you liked my card and my story...Please don't hestitate to contact me if you need any help or want any of these products. I don't have a webpage yet but I'm working on it. In the meantime, you can just go to www.funstampersjourney.com and just say that Donna M Smith, Journey Coach #10455 is your coach. Or you can contact me directly and I will help you out. I will also be doing some make it parties in Southern California and in Northwestern Arizona if you want to play with these awesome products in person...

Make your own creative journey fun...


Donna

Friday, September 6, 2013

Halloween Door Hanger

Just a little Halloween Wall or Door Hanging that I created for the next Pinterest Night at www.hearts-n-craftsetc.com  Pretty simple little project inspired by www.obsessivelycrafting.com/2011/10/halloween-door-hanger.html

Hope you can join us on Tuesday, September 10th @ 6pm at Hearts N Crafts, Etc in Covina, CA to make these and also make some cute candy wrappers designed by Irma Swindells...I'm sure there will be some kits left over if you're in the area.

Anyway, in case you can't make it and want to know how to re-create it:

I used 4x4 squares of chipboard covered with cardstock and rounded the corners.

Frankenstein: Cut face on the Cricut with CTMH Artiste Cartridge @ 2 1/2". Handcut hair.
Ghost: Punched with 1" circle punch for eyes and 1 1/2" for mouth (double punched off center to make a smile). Add small bow.
Pumpkin Face: Cut on the Cricut with CTMH Artiste Cartridge @ 3 1/2". Cut Leaf on Cricut from Destinations Cartridge @ 1 1/2" (I believe?) and added a thin strip of paper curled around pencil.
Spider Face: Punched with 1" & 3/8" circles for eyes and 1 1/2" for mouth (again double punched off center to make a smile). Added black pipe cleaners for legs (only had enough for six legs...I know they are supposed to have eight...so mine is short...lol)

Attach all the squares to a yard of Burlap ribbon and add a Jute ribbon...both of which are super cool and are available at www.hearts-n-craftsetc.com store in Covina, CA.

Hope to see you there at the next Pinterest Night...

Donna

Saturday, July 20, 2013

Cupcake Cake & Cards

Little LED Tealight Cake

Even Cuter...Lit Up
Just a little LED tealight cake I made with the leftover scraps from the Cupcake Cards...super cute and super easy. It's just two scallop circles and one strip of paper then punched out some flowers and leaves for the top. Punch a hole in the center of the top one and punch a hole on the bottom over the little switch that turns it on and off. Glue it all together with a strong liquid glue like Scotch Quick Dry, add a little Stickles and that's it!!!This will be included in the Cupcake Card Class at www.hearts-n-craftsetc.com on Tuesday, July 30th at 6pm...sign up now!!!


Cupcake Birthday Card cut with Sweet Treats


Just a few cards I made with the Best Creations Cupcake Paper Line. Sorry for the quality of the photos...something happened to the files and I no longer have the cards to re-photo cause they are on display at www.hearts-n-craftsetc.com next to this super cute paper line. I can't wait to make a scrapbook layout with it...
These will all be offered as a class at www.hearts-n-craftsetc.com on Tuesday, July 30th at 6pm.

Cupcake Birthday Card...sentiment printed on computer & cut with Art Philosophy


Cupcake Birthday Card cut with Storybook & Flower Shop

Wednesday, July 3, 2013

Baby Shower Invitation


Just a quick baby shower invitation that I made with my nieces. My 4 year old great-niece even helped <3. Anyway, my niece wanted something she could hang on the bulletin board at work (she's a nurse) but she also wanted something the other nurses could take with them so this is what we came up with. The bottom where it says Baby Shower is a pocket that we put 25 of these little cards into with the info for the baby shower. Turned out really cute...as usual the pics do not really show how cute it was.

Everything was cut on the Cricut Expression. Can't remember the name of the cartridge at the moment??? Having a senior moment, I guess...lol. Will add to the post as soon as I get home and look at it. Anyway, the paper came from www.hearts-n-craftsetc.com which is by far my favorite local scrapbook store...I know I keep saying that but it's true. They are like Cheers in that everyone knows your name and they treat you like a friend not a customer!!! Love them!!!

Donna :-)

PS: The Cricut Cartridge was New Arrival...


Fourth of July Layout & Cupcake Toppers

Left Side of 4th of July Layout
 So It occurred to me that I never posted the pictures of my Fourth of July Layout...Sorry!!!

Anyway, here they are...I used the same paper and stickers that I used on the Fourth of July Banner.

Everything was purchased from www.hearts-n-craftsetc.com (my favorite scrapbook store).

Right Side of 4th of July Layout


Cupcake Toppers we added to Banner Class...


Picture of Banner in Store after I added the ribbons...

Friday, June 14, 2013

4th of July Banner & Pillow Box

Close Up of First Part of Banner

Close Up of Part of Banner

Close Up of Part of Banner

Close Up of Last Part of Banner
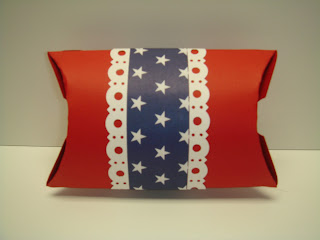
Front of Pillow Box

Back of Pillow Box
 
A project for the Hearts-n-Crafts Scrapbook Store (my favorite). I am loving being on the design team. Anyway I made this awesome banner. It doesn't show up well in the photos...it is much cuter in person. Go by Hearts-n-Crafts and see it in person. It will probably be offered as a class so sign up while you're there. You can pick up all the papers and stickers there as well.

I used the Reminisce Celebration paper line with the Reminisce Made in the USA Stickers. It was so easy with so many great patterns to choose from. I added some silver stickles and some red, white, and blue tulle.

I used the CTMH Art Philosophy Cricut cartridge to cut the banner pieces and the stars but you could also use the Birthday Bash cartridge. I also used the Ashlyn's Alphabet Cricut cartridge to cut out the letters. Don't forget Hearts-n-Crafts rents Cricut cartridges if you don't have it in your collection.

I added red & blue ribbons in between each banner piece just dangling down after I took the pictures & it really added to the cuteness.

The pillow box was super easy. Just cut the box on the Cricut. Used a Martha Stewart border punch. Made a rosette out of a 1 1/2 inch x 24 inch strip...scoring every 1/4 inch. Then stuck another of the great stickers on it...piece of cake!!!

I also made a scrapbook double layout but that will be my next post. Hope you enjoyed my projects.

Donna :-)


Tuesday, May 28, 2013

At the Beach Page


Here is my first submission as an official member of the Hearts-N-Crafts, Etc Design Team. If I may say so, I think it turned out pretty cute...lol

I used the Authentique Seasons Paper Collection (Summer 1, 2, 3, and Enhancements). I also used a few scraps of cardstock, ribbon, and raffia. I used various colors of Versa Color Inks and a White Pen to add the final details.

Everything I used can be purchased at my favorite scrapbook store, Hearts-N-Crafts, Etc. in Covina, CA. Of course, you can also see the original page displayed next to the paper collection. Whoo Hoo...my first one in the store...lol.

The border and embellishments at the bottom of the page were cut with the Cricut using mostly the Life is a Beach cartridge. I also used the Everyday Paper Dolls for the sand dunes/sand castle and the Base Camp cartridges for the "at the" lettering.

Don't have these Cricut Cartridges? Did you know that Hearts-N-Crafts, Etc rents cartridges for an extremely reasonable price? Have a Cricut but not sure how to use it to the fullest? Did you know that Hearts-N-Crafts, Etc has Basic and Advanced Cricut Classes? Also Gypsy & Cricut Craft Room Classes? That's why they are my favorite store...they go out of their way to help you create!!!

Keep on Scrappin,
Donna :-)